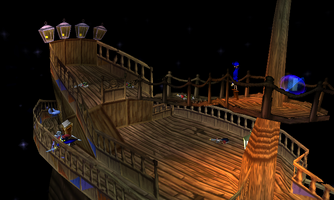
| “ | Conventional wisdom says you shouldn't jump onto giant Ghost Ships in the sky. However, it's still a safer air travel method than catapults. | ” |
The Ghost Ship (幽霊船 Yūreibune) is the nineteenth level of MediEvil. It is a pirate galleon which flies through the air. It is commanded by the Ghost Ship Captain.
Walkthrough[]
Walkthrough by Mirrorstar[]
Welcome to what is, in my opinion, the nastiest area of the game.
To your left, you will see a blue hand and the FIRST BOOK. The first skeletons you fight are ones that do not count towards your Chalice and they reset if you leave the area and return. There are more such skeletons.
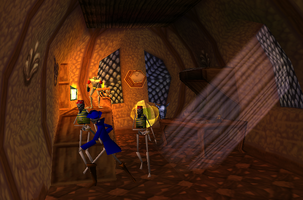
At first, walk to the right. Look around yourself. Above, you will see skeletons on the floor and one skeleton, in a blue coat, walking. The one in the blue coat is the officer. Kill him and the rest will die, so to speak. Otherwise, the rest can come back after you kill them. You also need to kill the officer to get any of them to appear in your Chalice.
Go left and up a ramp. This allows you to go up a ramp to the right. Pick up the MOON RUNE. Walk back down both ramps and return to where you started. Walk into the blue hand to use the Moon Rune and enter the doorway.
This room also has an officer to kill. Pick up the ENERGY VIAL and the STAR RUNE. There is also a MERCHANT GARGOYLE here. Leave the room.
Walk to the right. Walk up so that you can go right and approach the trap doors which are opening and closing. If you want to cross without falling into the holes, time your jumps for when the door you want to land on is closing. Also, notice the beams in-between the doors. You can stand on them. So, try to stay on them if possible. However, feel free to drop down into one of the holes.
You will drop into a room with rolling barrels. Here you will find a BAG OF COINS and a chest with a SILVER SHIELD. Time your passage so that you avoid the barrels. Walk up the ramp and out of this room. This puts you on the other side of the trap doors.
You will be back on the top deck again and at more rolling barrels. You can jump over the barrels as well as dodge them. Run to the right as far as you can, then run down and over to the right to get a BAG OF COINS. Go back to the left, go up part of the way, and go to the right to find a FOUNTAIN. Continue up all the way and go to the right to walk into the yellow hand and use the Star Rune. This opens a doorway. Drop down as soon as you can and kill the officer. This will open up a way for you in the lower right.
Be careful not to fall off of the side of the ship and into the void as that will drain your life meter. Here are four cannons. Walk past them, one at a time, making sure you time your movements so that they do not hit you. Then, you will find the CHAOS RUNE. Walk back past the four cannons to where you last fought an officer. Walk into the red hand to use the Chaos Rune.
This leads you to some netting. First, drop down to below the netting.
You land right next to the officer, so kill him. Walk out of the room on the right. You will find yourself on a suspended walkway. On this walkway, you will find a BAG OF COINS, an ENERGY VIAL, and another ENERGY VIAL. While you are here, press and hold L2 and R2 and look up. You should see the paddles turning above you.
Return back into the room below the netting. In the left side of the room, jump on the large crates to go to the upper left corner. Then, jump into the doorway that leads to the next room.
There are huge cannons in this room which you must pass. For the first one, after it fires, run towards it and drop into the hole in the floor. Wait until it fires again, then jump out of the hole and run past it. The second one is firing too high to hit you while you are on the floor. But, you have to jump over two obstacles, so time your jumping well. You can pick up an ENERGY VIAL as you walk through here. There is no help for the third cannon. After it fires, run and press the Triangle button to do the Daring Dash which allows you to run faster for a moment. Do the same for the last cannon. You will then find a CHEST OF COINS. Walk up the ramp to exit this room.
You will return to where you used the Chaos Rune. This time, use the netting to cross. Think of the squares of the netting like trampolines. The more you jump on them, the higher you will jump. The higher you jump, the more of a chance you have of making it to the next square. Dan does cast a bit of a shadow and it can help you tell where he will land. You want to make your way to the upper square of netting on the far right. Once there, turn the camera angle so you can line yourself up with the exit properly. Then, jump as high as you can and push towards the mast to jump up onto that level.
(There is more than one way to cross over this next area. If you fall from the paddles or the swinging boards, you will either fall into the void and lose what is in your life meter, or you will fall to the suspended walkway.)
If you go down all the way from the mast, though try to make sure you do not fall into the void, you will find cannons which fire outside of the ship. There are doors that open and allow them to fire. The first door opens and closes slowly. The middle door opens and closes at a medium speed. The last door opens and closest quickly. If timed well, you can do walking jumps from one to the other to make your way across. (My suggestion is to make sure the first door comes up first and the middle door is just coming up as you try to jump across.) This brings you to a FOUNTAIN. From there, start close to the side near the paddles and do a walking jump onto one of the turning paddles.
If you would rather not go that way, from the mast, go up all the way. Then, when the swinging board is close enough, do a walking jump to the right and onto it. Then, you can turn the camera angle if it helps. When the first board is close enough to the next board, do a walking jump onto the next one. When the second one is close enough to the third board, do a walking jump to the third one. From here, you can drop onto one of the turning paddles.
(While on a paddle, you can jump up onto the area with the Fountain.)
You should see an area with steps. From the paddle, walk to that area. No jump is required. Kill the four skeletons and the barrier will break allowing you access to another officer. Kill him and the doorway will open to the boss. Notice on the level where you killed the first four skeletons, there is a MERCHANT GARGOYLE.
Go back down the steps and walk onto one of the paddles. On the other side, the paddles come close to an elevator. Jump into the elevator. Jumping while inside the elevator will make it go up and down. With the elevator raised, do a walking jump to the right and onto a walkway. Run all the way to the end and kill the officer. Also, pick up the ENERGY VIAL. Then, you should be able to collect the Chalice. Do a walking jump back into the elevator. This time, with the elevator raised, do a walking jump to the left. You will find an ENERGY VIAL and the CHALICE. Do a walking jump back to the elevator. With the elevator raised, do a walking jump to the right. Walk right all the way and drop off the end.
This puts you back where you were. Read the SECOND BOOK, then go through the doorway to the boss.
The door will close behind you. In the chest, you find a CLUB. Stand with the tip of the Club in the fire to light it. Stand with the fire of the Club at the back of a cannon to fire the cannon. There are two cannons you can fire, and you must light them each time you want to fire one shot. If you just stand there with your lit Club, the cannon will fire repeatedly. Try to time your shots so that they hit the Ship's Captain who is walking back and forth. If the fire goes out on your Club, light it again.
If the skeletons attack, equip the Magic Sword and run around slashing at them until they are all on the floor. Then, resume lighting the cannons until they attack again. Repeat the process until the Ship Captain has been defeated.
Once defeated, the door will open so that you can go back out into the ship. The blockage will also have been removed so that you can exit this level by taking control of the ship.
Book of Gallowmere[]
Friendlies[]
Birds only like one person in their life. For some reason, this one likes Dan.
This scavenger saw a corpse-meal, and instead found a friend. What a lovely way to meet!
Even in medieval times, there were vending machines designed to part a foolish hero from his gold.
Clever customers may qualify for a discount... just don't ask the merchant how he acquires his wares.
Enemies[]
These are spineless sea dogs with a penchant for plundering. They never complain, even when cleaning the poop deck.
Obedient to a fault, they won't even revive themselves unless commanded to.
The Pirate Captain's right-hand men, despite their lack of right hands.
Their main qualification? Being of no discernible threat to the Captain.
Bosses[]
Is it really possible to be a ghost, a skeleton and a pirate? Yes! Not only that, but this Halloween trifecta is so fearsome that he was promoted to captain after just a single mutiny!
The other pirates look up to him... well, he is twice their size.
Books[]
- Main article: MediEvil books
Book 1[]
Most of the crew seem to be under the control of a few officers - without them they'd be like headless chickens...
Book 2[]
The Ghost Ship Captain is as tough as old sea boots!
You will need something a little more powerful than the weapons in your inventory to knock him overboard!
Related trophies[]
Defeat the Ghost Ship Captain aboard the Ghost Ship. |
Gallery[]
| |||||||||||||||||||||||||||||||||||||||||||||||||||||||||||||||||||||||||||||||||||||||||||||||||||||||||||||||||||||||||||||||||||||||||||||||||||||||||||||||||||||||||||||||||||||||||||||||||||||||||


